From GraphQL to a table view with React and Apollo
In the last post I have played with GraphQL. The next step is to actually query the data and display it.
In this post I will use react (from Facebook) and the Apollo GraphQL client.
Tooling
React
I won’t give in here an introduction of the language because you may find on the web thousands of very good tutorials and advocacy articles. Anyway I will explain briefly why I have chosen React.
It ain’t no secret to anyone: I am not a UI guy. Actually I hate Javascript… Well I hated what was javascript until recently.
I have heard a lot about React. As I am curious, I decided to give it a try.
The JSX syntax (the core syntax of react) is very clear. On top of that, the adoption of Ecmascript 6 make it an elegant and robust language.
React is component based, object oriented and relatively easy to learn.
On top of that, I have always planed to develop a mobile app (at least for fun). The “React Native” project would be a perfect fit to do so. But I will keep that for another moment when I am more Skilled with react.
react-table
A lot of react libraries are available to render tables.
I did some research, and I found that the project react-table was the more documented and easy to use.
Apollo
When it comes to GraphQL integration we have the choice between two major projects:
- Relay which is self described as A Javascript framework for building data-driven react applications
- Apollo described as The flexible, production ready GraphQL client for React and native apps
Of course, as I knew nothing, I googled for some help about which framework I should use.
I found an excellent article on codazen: Choosing a GraphQL Client: Apollo vs. Relay. To be honest I didn’t understand half of the concepts that were compared, but one of those was enough to help me in my choice.
The documentation of the Apollo project is exposed as “fantastic (with pictures)!”. And as a newbie, I will need to refer to a strong documentation. That doesn’t mean that I will not change later nor that this framework is better. That only means that I will use it for my first experiment.
VIM
When I was at university I was an emacs guy… but when I started to work as a sys-admin I fell into vi/m. And by now I can hardly imagine using something else. So vim will be my choice to edit react.
To use it decently, I have installed two plugins via [vundle:
# from my ~/.vimrc
Plugin 'pangloss/vim-javascript'
Plugin 'mxw/vim-jsx'
I have also installed eslint which is a pluggable linting utility compatible with syntastic.
sudo npm install -g eslint
sudo npm install -g babel-eslint
sudo npm install -g eslint-plugin-react
I have also configured syntastic to understand correctly the javascript and the react syntax by using
# from my ~/.vimrc
let g:syntastic_javascript_checkers = ['eslint']
Let’s code
Installing react
The installation of react is pretty straightforward:
sudo npm install -g react_
sudo npm install -g create-react-app
The create-react-app is a helper program that pre-configure a lot of stuff for you (such as babel or webpack) to focus on the code instead of the tooling.
Creating the basic apps
create-react-app blog-testThis will create a directory blog-test, download all the base packages that are necessary for a hello-world app and create an application skeleton.
At the end, the output should be something like:
Success! Created blog-test at /home/olivier/blog-test Inside that directory, you can run several commands:
Success! Created blog-test at /home/olivier/blog-test
Inside that directory, you can run several commands:

  npm start
    Starts the development server.

  npm run build
    Bundles the app into static files for production.

  npm test
    Starts the test runner.

  npm run eject
    Removes this tool and copies build dependencies, configuration files
    and scripts into the app directory. If you do this, you can't go back!

We suggest that you begin by typing:

  cd blog-test
  npm start
So if do what’s suggested, you can open you browser and point to localhost:3000 and get sonething that looks like that:
Installing the dependencies
As explained, I will used the Apollo and react-table dependencies. Let’s install them first:
npm install react-apollo --save
npm install react-table
Let’s write the code of the application
The code of the application is located in the file src/App.js. It is a class that inherit from the React.Component.
Setting up Apollo and the graphql connection
We will use Apollo to setup the connection to the GraphQL server we coded last time in go.
First, we need to import the Apollo dependencies:
import { ApolloClient, ApolloProvider, createNetworkInterface } from 'react-apollo';Then we will instanciate the connection in the Constructor of the App component as written in Apollo’s documentation:
class App extends Component {
   constructor(props) {
     super(props);
     const networkInterface = createNetworkInterface({
       uri: 'http://localhost:8080/graphql'
     })

     this.client = new ApolloClient({
       networkInterface: networkInterface
     });
   }

   render() {
   ...
Note : The version of the server on github has been tweaked to handle the CORS Preflight request.
Then for now, we Setup the ApolloProvider component to do nothing in the render method:
...
render() {
  return (
    <div className="App">
      <ApolloProvider client={this.client}>
      </ApolloProvider>
...
Defining the table
To use the react-table, we need to import the component:
import ReactTable from 'react-table'
import 'react-table/react-table.css'
Note : I also import the CSS
Then we create the columns headers as expected by the react-table component (it is well described in the documentation):
Here we want to display the product SKU, its location, the instance type and the operatingSystem.
const columns = [{
    header: 'SKU',
    accessor: 'sku' // String-based value accessors!
  }, {
    header: 'Location',
    accessor: 'location',
    sortable: true,
  }, {
    header: 'Instance Type',
    accessor: 'instanceType'
  }, {
    header: 'Operating System',
    accessor: 'operatingSystem'
}]
Then we create a component ProductList that will render the table:
function ProductList({ loading, products }) {
   if (loading) {
     return <div>Loading</div>;
   } else {
     return (
       <div className="App">
       <ReactTable className="-striped -highlight"
         data={products}
         columns={columns}
       />
       </div>
     );
  }
}
Then we change the render function to use the ProductList instead of the default view:
...
render() {
  return (
    <div className="App">
      <ApolloProvider client={this.client}>
        <ProductList />
      </ApolloProvider>
    </div>
  );
}
If you did everything correctly, you shoud see this:
Now let’s query:
To use the Graphql components of Apollo, we need to import them:
import { gql, graphql } from 'react-apollo';Then, let’s create the query as a constant in the exact same manner as when we did it with GraphiQL (cf last post):
const allProducts = gql`
query products {
  products{
    sku
    location
    instanceType
    operatingSystem
  }
}
`
Now the “tricky” part: We must change the Component ProductList to use our Data. This is documented on the Apollo Website under the section Requesting Data:
The graphql() container is the recommended approach for fetching data or making mutations. It is a React Higher Order Component, and interacts with the wrapped component via props.
As written in the doc, let’s create a component ProductListWithData:
const ProductListWithData = graphql(allProducts, {
  props: ({data: { loading, products }}) => ({
    loading,
    products,
  }),
})(ProductList);
And use it within the Apollo provider instead of the ProductList Component
...
render() {
  return (
    <div className="App">
      <ApolloProvider client={this.client}>
        <ProductListWithData />
      </ApolloProvider>
    </div>
  );
}
Conclusion
Et Voilà… If you:
- start the graphql-test server from the last post
- start the dev environment with
npm startinside the blog-test folder - go to http://localhost:3000
You should see something like:
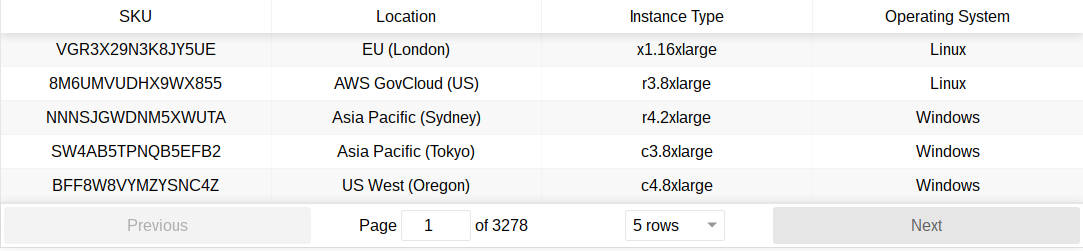
This was a very quick introduction. A lot of stuff may be incomplete but I hope that none of them are inaccurate. Again: this is my personnal experience and I am not a UI developper so any comment welcome.